Years ago I purchased a book called “Physical Computing”. It’s a terrific tutorial on how to interface computer and
microcontroller boards with the physical world through sensors and actuators. If you’re interested in a career in
automation or robotics, or just love electronics as a hobby, this is a great time! There’s never been more hardware
and software to choose from at a more affordable price. One of the providers of this equipment is a company called
Arduino. They’ve been getting a lot of positive attention for their offerings, and I thought they’d be a good
contact for writing about how to get started using microcontroller boards. When I contacted them I quickly heard
back from a gentleman named Tom Igoe, who said he’d be happy to talk on the phone about it. It wasn’t until I began
the phone conversation that I realized he was also co-author of my book “Physical Computing”. I should have
recognized the name but it was a pleasant surprise that I hadn’t. Here are my questions to him based on my own
curiosities.
Q. Your website states that Arduino is “intended for artists, designers, hobbyists, and anyone interested in
creating interactive objects or environments”. Hobbyists would be obvious users, but what would be examples of
artists and designers?
I teach at the Interactive Telecommunications Program at NYU and artists and designers would be about 90% of my
audience. My involvement in Arduino began with a program I had here called “Physical Computing” which is all about
getting students who are coming from non-technical disciplines and giving them hands-on experience with interactive
technologies. We’ve been using things like the Basic Stamp, and other microcontroller boards that are out there, to
do that but most of the stuff we’d been seeing was created by engineers with engineers in mind. What we tried to do
with Arduino was take an approach that doesn’t make those same assumptions, and tries to make the technology
accessible to non-technologists.
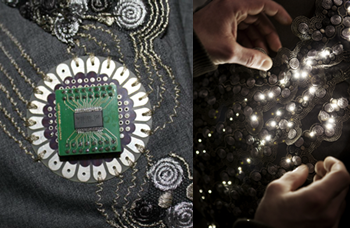
The
Climate Dress project
by Danish company Diffus uses over a hundred micro-LEDs, a CO2 sensor, and an
Arduino LilyPad microcontroller. It monitors ambient carbon dioxide and illuminates the LEDs according to the
concentration.
Q. On your website you have a selection of main and auxiliary boards. What would be the main controller boards that
someone would begin with?
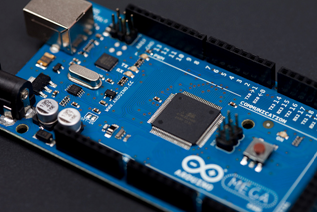
Our main board is the Arduino Uno, which is an 8-bit controller. It’s got 20 I/O pins and it’s designed for people
to very easily get sensor data in, or to send signals out to actuators. There’s a larger version called the
Arduino Mega 2560 that has the same processor family except that it has 57 I/O pins, 4 hardware serial ports
instead of 1, and a little bit more memory. There are some specialty boards like the LilyPad, which is designed
for use in wearable applications, so it’s easy to sew into garments and use conductive thread as the wiring
between components. The Ethernet board is designed for embedded network applications. The Mega ADK has USB host
built in and it’s really great for connecting to Android cell phones and other USB devices. The auxiliary boards
are called “Shields” and add functionality to the main boards. For example, the Wireless Shield allows you to
attach a radio transceiver on board. We designed it originally with Digi’s Xbee transceivers in mind but it can
be used with other things too. There’s a Motor Shield, which allows you to easily control stepper and servo
motors. There’s a lot of 3rd party Shields as well. We tried to make the system as openly compatible as possible
and that’s one of the reasons it’s all open-source, including the hardware design.
Q. What is meant by Shield?
A Shield is just a plug-in board. Rather than having to design and build the auxiliary circuitry yourself you
can just plug a Shield right on top of the main board to get that functionality. The term came about because
Arduino was one of the first regional kings of Italy and we figured that kings from that period had shields.
Q. You said that you don’t think of these as computer boards but as microcontroller boards. How would you draw
the distinction between them?
When you call something a computer people have a very specific image in mind. They imagine something with a
keyboard, a mouse, a screen, and can run an operating system. That’s not what this is, so calling it a
microcontroller board sends a more specific message and opens up the discussion as to what one is and what you
can do with it, and how computing goes further than computers. A large reason that we’ve done what we have was
to get people to expand their imaginations about what computing is.
Q. But they are capable of performing mathematical computation?
Yes, technically they are computers. We may eventually make something that’s more like a typical computer board
but for right now we’ve been making that distinction so that people think about them as something different than
that.
Q. What types of signals are the Uno and Mega 2560 controller boards compatible with?
The boards are typically 5 volt although some are running at 3.3 volt as well. The inputs are just basic TTL
digital with a number of analog inputs also. The Uno has 14 digital I/O pins and 6 analog inputs, and the
Mega 2560 has 54 digital I/Os and 16 analog inputs. The analog inputs use a 0-5 volt or 0-3.3 volt range and
have a built-in analog reference so you can change that.
Q. Can you describe the programming software that’s designed for these boards?
It’s basically just a wrapper around the AVR GCC compiler, so it’s all C code, and we’ve written IDE software
for it to make it compatible with Windows, Mac, and Linux. A couple of factors played into it: We looked at what
the technical limitations might be for non-technical people learning C. One of them is “pointers” and memory
management. C code tends to be very terse and difficult to read for everyday people, so we tried to make our
function names more descriptive of what they did. Secondly, we tried to shield the memory management from the
user so they didn’t have to worry about it as much. We also tried to make the basic functions as simple as
possible, so there’s a setup and a loop and that’s it. You can add functions, or expand to assembly-level code
if you want, but as a beginner you shouldn’t need more than 2 or 3 lines of code to get started with an LED
blinking on a pin. That simplicity has been very important to us. Our philosophy is what I call a “glass box
enclosure”. The libraries aren’t compiled until you do the final upload to the processor, so you can look inside
and change them if you want. They’re written in a way to be as readable and understandable as possible.
Q. How can you expand beyond the limitations of the board you’ve selected? For example, if you need more I/O.
I get this question with students a lot. You would expand the same way as with any other microcontroller board.
I describe these methods in detail in chapter 14 of my book “Physical Computing”. You can use multiple switch
inputs on a resistor ladder to generate a single analog input. You can also use shift registers or multiplexers.
Or you can use additional microcontrollers and link them together using synchronous serial communication.
We have instructions on our site on how to do that.
Q. Do you have any announcements on future projects that you’re working on?
We recently announced that we’re working on a 32-bit board that should come out late 2011 or early 2012.
We’re also working on a cheaper version of our main board called Leonardo, which has native USB and will
show up on your computer just like a mouse or keyboard. We announced a Wi-Fi Shield that will allow you to
connect to Wi-Fi networks. There’s an educational robot that we’re working on for kids. There’s also about
15 other things that we’re working on that aren’t ready for announcement yet.
Links:
Getting Started with Arduino
BLOG announcements
